
Epoxy Flooring Installation Process Steps in Texas: The Complete Expert Guide
Quick Answer
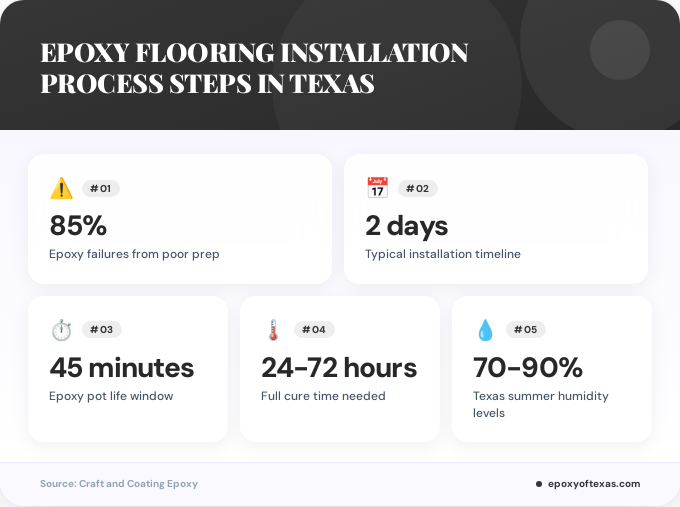
The epoxy flooring installation process steps in Texas typically span two days: Day 1 involves thorough surface preparation including cleaning, crack repair, and etching, followed by a 24 to 48 hour drying period. Day 2 includes primer application, precise epoxy mixing within a 45-minute pot life, and systematic coating application working from corner to exit, with full cure times ranging 24 to 72 hours depending on Texas climate conditions.
When homeowners and business owners across Texas consider upgrading their concrete surfaces, understanding the precise epoxy flooring installation process steps becomes essential. Did you know that over 85% of epoxy floor failures occur due to improper surface preparation rather than product quality? This statistic highlights why following a methodical, professional installation process is critical for achieving durable, attractive results that can last 15 to 20 years or more in residential applications.
Whether you’re in Travis County, Williamson County, or throughout the greater Austin region, the epoxy flooring installation process in Texas follows a systematic approach designed to combat our unique climate challenges, including temperature fluctuations, humidity variations, and substrate conditions specific to Central Texas concrete.
This comprehensive guide breaks down every critical step of professional epoxy installation, from initial surface assessment through final curing, providing you with the expertise needed to understand this transformative flooring solution.
What Is the Complete Epoxy Flooring Installation Process in Texas?
The epoxy flooring installation process in Texas is a multi-stage procedure that typically spans two to three days from start to finish. Professional installers break the process into distinct phases: surface assessment and preparation, substrate treatment, primer application, epoxy coating installation, and curing periods.
According to Sherwin-Williams industrial flooring experts, the installation timeline directly correlates with substrate conditions and environmental factors. In Texas, where humidity levels can reach 70% to 90% during summer months, installation timing becomes particularly critical.
Professional epoxy contractors in Texas understand that successful installations require balancing temperature control, moisture management, and precise application techniques. The process cannot be rushed, as each stage builds upon the previous one to create a chemically bonded, seamless surface.
Day 1: How Do You Properly Prepare Concrete for Epoxy Installation?
Surface preparation constitutes the most labor-intensive yet absolutely critical phase of the epoxy flooring installation process steps in Texas. This stage determines whether your epoxy coating will bond permanently or fail prematurely within months.
The preparation sequence begins with complete space clearance. Remove all items, furniture, equipment, and movable fixtures from the installation area. Even minor obstructions can compromise the workflow and create uneven application patterns.
Next comes thorough cleaning using industrial-grade equipment. Professional installers employ a three-stage cleaning process: sweeping to remove loose debris, vacuuming with HEPA-filtered equipment to capture fine particles, and wet mopping to eliminate residual dust that could prevent adhesion.
Crack Repair and Surface Damage Assessment
Texas concrete frequently develops cracks due to soil movement, particularly in areas with expansive clay soils common throughout Central Texas. Before proceeding with epoxy application, all cracks wider than 1/16 inch must be filled and repaired using appropriate concrete patching compounds or epoxy crack fillers.
Professional contractors at epoxy flooring installations in Hutto, TX typically use flexible epoxy crack repair products that accommodate minor substrate movement without compromising the finished floor integrity. These repairs must cure fully before proceeding to the next stage.
Decontamination and Degreasing
Oil stains, grease deposits, and chemical contaminants create invisible barriers that prevent proper epoxy adhesion. The decontamination process involves applying commercial-grade degreasers or alkaline cleaners specifically formulated for concrete preparation.
In garage applications, where automotive fluids frequently penetrate concrete, degreasing may require multiple applications with mechanical scrubbing to fully extract contaminants from the concrete pores. This step cannot be skipped or shortened, as even trace amounts of petroleum products will cause delamination.
What Is the Correct Etching Process for Texas Concrete Floors?
Surface profiling through chemical etching or mechanical grinding creates the microscopic texture necessary for epoxy adhesion. According to concrete flooring specialists, proper surface profiling should achieve a texture similar to medium-grit sandpaper, described as CSP 2 to 3 (Concrete Surface Profile).
For most residential and light commercial applications in Texas, acid etching provides an accessible and effective surface preparation method. The process uses diluted muriatic acid or specialized etching compounds that chemically react with concrete to open the surface pores.
| Preparation Method | Best For | Time Required |
|---|---|---|
| Acid Etching | Residential garages, new concrete | 2 to 4 hours plus drying |
| Diamond Grinding | Commercial spaces, sealed concrete | 4 to 8 hours depending on area |
| Shot Blasting | Industrial facilities, heavily contaminated floors | 6 to 12 hours for large areas |
Step-by-Step Acid Etching Protocol
The etching process requires careful execution and appropriate safety equipment including chemical-resistant gloves, eye protection, and respiratory protection. Work in sections of approximately 10×10 feet to maintain control over the chemical reaction and rinsing process.
Begin by pre-wetting the concrete surface with clean water, which helps regulate the acid reaction and prevents over-etching. Mix the etching solution according to manufacturer specifications, typically one part acid to three or four parts water, always adding acid to water, never water to acid.
Apply the etching solution using a watering can or pump sprayer, distributing it evenly across the section. Use a stiff-bristled brush to scrub the solution into the concrete, ensuring complete coverage. The solution should fizz and bubble actively, indicating the chemical reaction is opening the concrete pores.
Allow at least 15 to 20 minutes of contact time before rinsing thoroughly with clean water. Multiple rinses may be necessary to achieve a neutral pH, which you can verify using pH test strips. The concrete should feel slightly rough to the touch, similar to fine sandpaper.
After etching completion, the concrete requires a minimum drying period of 24 to 48 hours in Texas climate conditions. During humid summer months, this drying period may extend to 72 hours to ensure moisture content falls below 4%, the maximum acceptable level for epoxy application.
Day 2: How Do You Apply Epoxy Flooring Like a Professional?
Once the substrate preparation is complete and thoroughly dried, the actual epoxy application process begins. Professional installers in Lakeway, TX epoxy flooring projects typically schedule application days when temperatures will remain between 60°F and 85°F with relative humidity below 85%.
The application phase follows a carefully orchestrated sequence: primer application, base coat installation, optional decorative elements, and topcoat sealing. Each layer must be applied within specific time windows to achieve proper chemical bonding between coats.
Primer Application Protocol
The primer coat serves as the critical bridge between concrete substrate and epoxy coating system. According to epoxy flooring installation experts, primer selection depends on substrate porosity, moisture conditions, and the specific epoxy system being installed.
Mix the primer components according to exact manufacturer ratios using clean containers and mixing paddles. Pour the mixed primer onto the concrete and distribute using a 3/8-inch nap roller or squeegee, working systematically to ensure complete coverage without puddles or dry spots.
Pay particular attention to previously repaired areas, expansion joints, and perimeter edges where primer penetration is critical. The primer typically requires 4 to 8 hours of cure time before becoming ready for the base coat, though high humidity may extend this period.
What Are the Critical Mixing Guidelines for Epoxy Products?
Proper epoxy mixing is non-negotiable for successful installation. Epoxy products consist of two components, resin and hardener, that must be combined in precise ratios to initiate the chemical curing reaction. Incorrect mixing ratios, inadequate stirring, or contaminated containers will result in coating failure regardless of how well other steps are executed.
Most epoxy flooring systems designed for Texas applications have a pot life of 35 to 45 minutes at 75°F. In warmer Texas conditions, particularly during summer months when garage temperatures can exceed 95°F, pot life may shrink to as little as 20 to 25 minutes.
Mixing Procedure Standards
Use clean, dry mixing containers sized appropriately for the batch volume. Pour the entire contents of the hardener component into the resin component, ensuring no material remains in the hardener container. Mix using a slow-speed drill with a mixing paddle at 300 to 500 RPM for a minimum of 3 minutes.
During mixing, scrape the sides and bottom of the container multiple times to incorporate all material. The mixed epoxy should show no streaks, swirls, or color variations when mixing is complete. Some professional installers employ the double-bucket transfer method, pouring the mixed epoxy into a second clean container to ensure complete homogenization.
After thorough mixing, allow the epoxy to rest for 1 to 3 minutes depending on ambient temperature and humidity. This brief induction period allows the chemical reaction to begin and helps release trapped air bubbles that could mar the finished surface.
Calculate the exact quantity needed for each section before mixing. It’s far better to mix multiple small batches than to mix too much epoxy that begins to gel before you can apply it. For large projects, professional crews typically work with two-person teams where one person mixes while the other applies, maintaining continuous workflow.
What Application Techniques Ensure Professional Results?
The actual epoxy application requires systematic planning and precise execution. Professional techniques used in residential epoxy flooring installations throughout Texas emphasize working efficiently within the pot life while maintaining consistent coating thickness.
Begin application in the corner farthest from the exit, working systematically toward the doorway to avoid trapping yourself in wet coating. Pour the mixed epoxy onto the concrete in ribbon patterns, using approximately one gallon per 80 to 100 square feet depending on desired thickness.
Spreading and Rolling Techniques
Use a notched squeegee or magic trowel to spread the epoxy evenly across the floor surface. The spreading tool helps achieve consistent mil thickness while working the coating into surface irregularities. Follow immediately with a 9-inch roller using a 3/8-inch nap sleeve to smooth and level the coating.
Apply the epoxy using an “M” or “W” pattern with 1 to 2 inch overlaps between passes. This technique ensures complete coverage without creating roller marks or thickness variations. Maintain a wet edge throughout the application, never allowing one section to begin setting up before the adjacent section is rolled.
For larger areas, back-rolling is essential. After spreading and initial rolling, make a final pass over the entire section with a fresh roller sleeve, using long, smooth strokes in a single direction. This technique eliminates bubbles, evens out any thickness variations, and creates the smooth, level surface characteristic of professional installations.
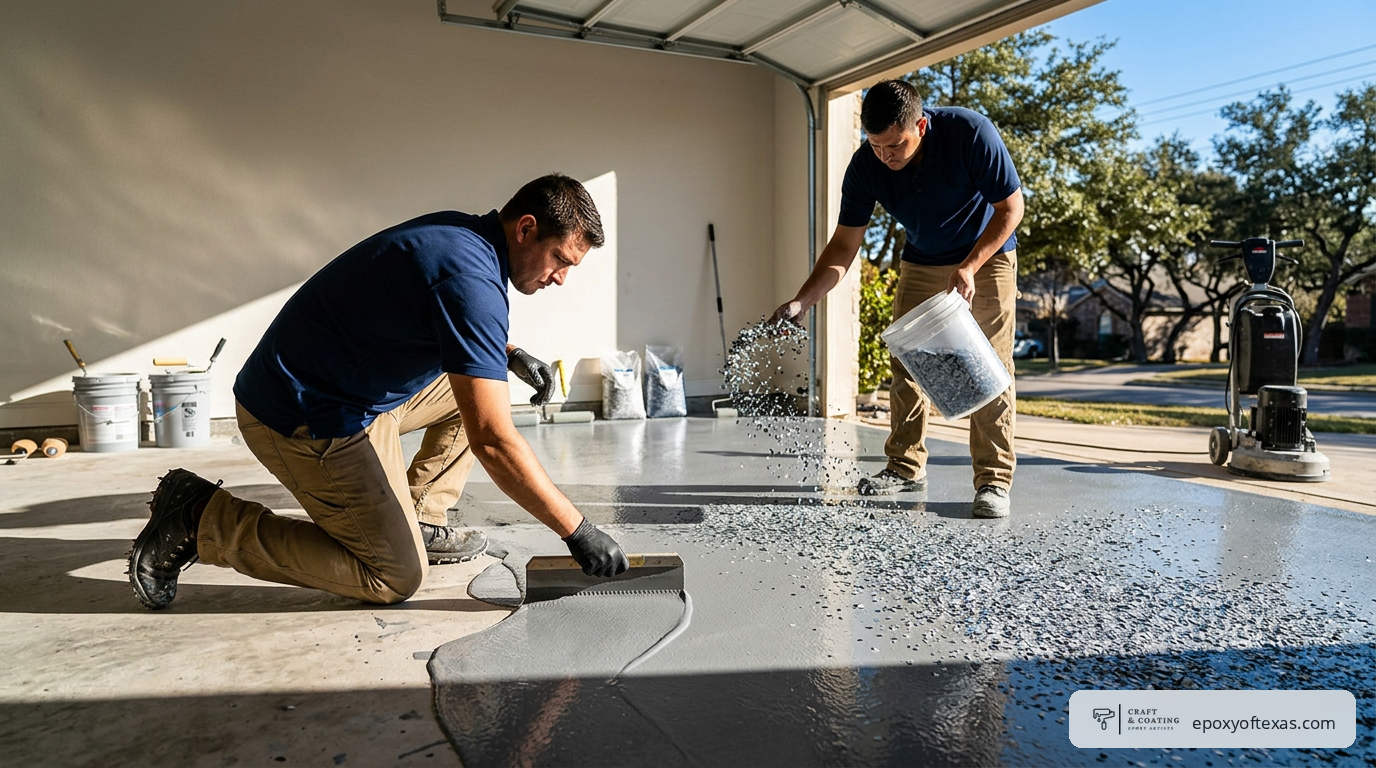
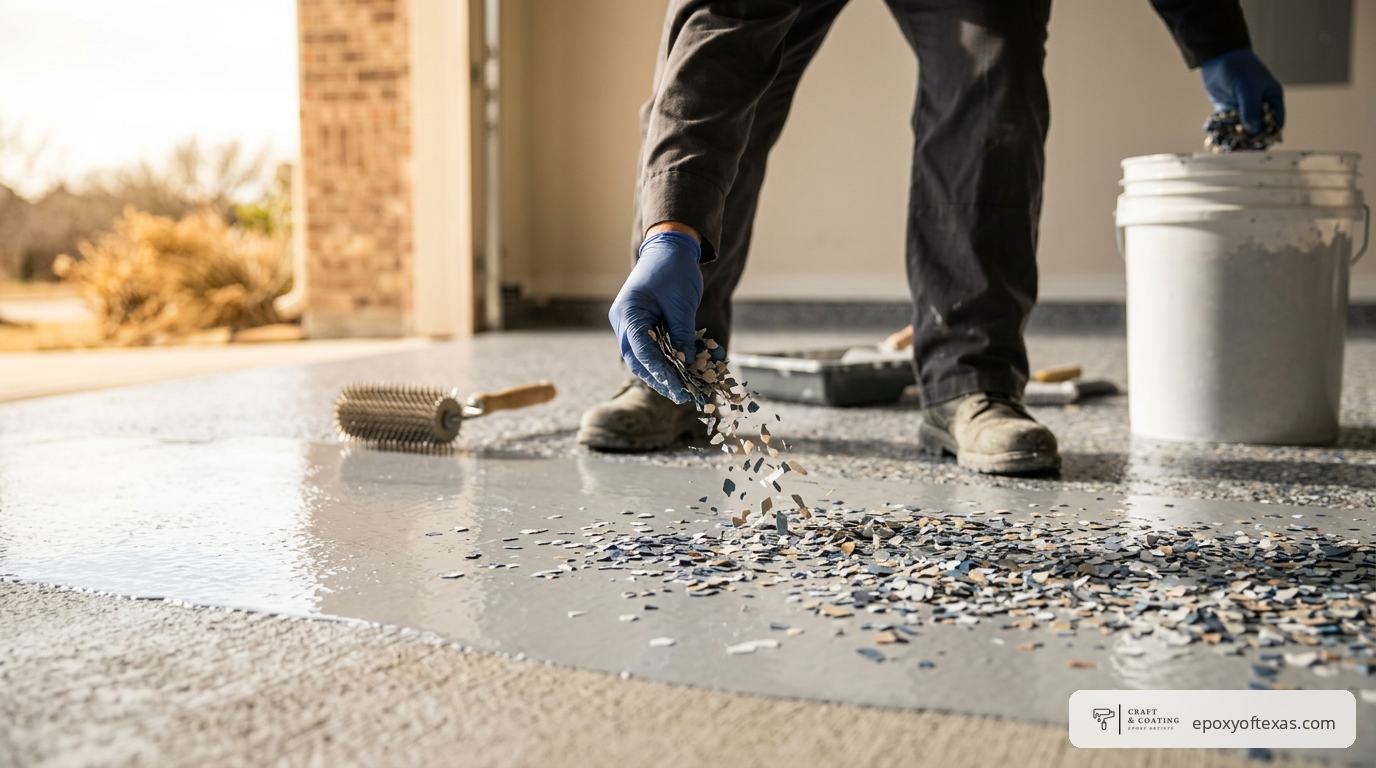
Decorative Element Integration
If incorporating decorative flakes, quartz, or metallic pigments, these elements must be broadcast while the base coat remains wet. For full-broadcast flake systems, apply flakes to rejection, meaning continue broadcasting until no more will stick to the surface, typically requiring 12 to 20 pounds of flakes per 100 square feet.
Metallic epoxy applications require specialized techniques including troweling, back-rolling with specific patterns, and sometimes torch manipulation to create the desired visual effects. These advanced techniques typically require professional expertise to execute successfully.
How Does Texas Climate Affect Epoxy Installation?
Texas climate conditions present unique challenges for epoxy flooring installation that directly impact product selection, application timing, and curing protocols. Understanding these regional factors is essential for achieving optimal results.
Temperature fluctuations in Texas can range from freezing conditions in winter to 100°F+ summers, with concrete substrate temperatures often 10 to 15 degrees higher than ambient air temperature in direct sunlight. These variations affect epoxy viscosity, pot life, cure rates, and final coating properties.
Summer Installation Considerations
During Texas summer months, particularly July through September when temperatures regularly exceed 95°F, epoxy installation requires special adaptations. High temperatures accelerate the curing reaction, reducing pot life by 30% to 50% and making application more challenging.
Professional installers often schedule summer applications for early morning hours, ideally beginning work between 6 AM and 8 AM when temperatures are most moderate. Climate-controlled interior spaces like garage floors prepared for epoxy in Texas may require supplemental cooling using fans or portable air conditioning to maintain optimal application temperatures.
High humidity, which frequently accompanies Texas heat, can cause epoxy to blush or develop a cloudy appearance on the surface. Maintaining air circulation with fans helps manage moisture levels and promotes proper curing.
Winter Installation Protocols
While less common, winter installations in Texas require attention to minimum temperature thresholds. Most epoxy products require substrate temperatures above 50°F to 55°F for proper curing. Cold concrete slows the curing reaction, potentially extending cure times from 24 hours to 72 hours or more.
In unheated garages during winter cold snaps, professional installers may employ portable heaters to warm the substrate before application and maintain ambient temperatures during curing. However, direct heating of epoxy during application can create bubbles and surface defects.
| Season | Optimal Temperature Range | Primary Challenges |
|---|---|---|
| Spring (March-May) | 65°F to 80°F | Occasional rain delays, pollen contamination |
| Summer (June-August) | 75°F to 85°F (early morning) | Extreme heat, reduced pot life, high humidity |
| Fall (September-November) | 60°F to 78°F | Ideal conditions, minimal challenges |
| Winter (December-February) | 55°F to 70°F | Cold substrates, extended cure times |
What Is the Complete Curing Timeline for Epoxy Floors?
Understanding the distinction between dry time, cure time, and full chemical cure is essential for properly managing expectations and protecting your investment. Epoxy coatings undergo a progressive hardening process that occurs in distinct phases.
Initial dry time, when the surface becomes tack-free, typically occurs within 8 to 12 hours at optimal temperatures of 70°F to 75°F. During this phase, the epoxy has hardened enough that dust and debris won’t stick to the surface, but it cannot support weight or traffic.
Progressive Cure Stages
Light foot traffic is generally permitted after 24 hours for most epoxy flooring systems, though professional installers recommend waiting 48 hours for residential applications and 72 hours for commercial spaces. During this initial cure phase, avoid dragging furniture, dropping heavy objects, or introducing chemicals to the surface.
Vehicle traffic on garage epoxy floors should be delayed until 72 hours minimum, with 7 days being optimal for full load-bearing capacity. This extended wait period is particularly important for larger vehicles, SUVs, and trucks that concentrate significant weight on relatively small tire contact patches.
Complete chemical cure, when the epoxy achieves its full strength, chemical resistance, and durability properties, requires 7 to 14 days depending on the specific product chemistry and environmental conditions. Until full cure is achieved, the floor remains slightly more susceptible to staining from chemicals, hot tire pickup, and impact damage.
Epoxy floors installed in Texas during summer months may cure slightly faster due to elevated temperatures, while winter installations require extended cure periods. According to longevity data from Austin epoxy installations, properly cured floors consistently outperform rushed installations by 3 to 5 years in terms of coating life.
What Are the Most Common Installation Mistakes to Avoid?
Even experienced DIY enthusiasts and occasional contractors make critical errors during epoxy installation that compromise final results. Understanding these common pitfalls helps ensure successful outcomes.
Inadequate Surface Preparation
The most frequent and consequential mistake is rushing or inadequately executing surface preparation. Approximately 85% to 90% of epoxy coating failures trace back to preparation deficiencies including insufficient cleaning, incomplete degreasing, inadequate surface profiling, or applying epoxy to damp concrete.
Professional commercial epoxy installations in Texas employ moisture meters to verify concrete moisture content before application. Substrate moisture above 4% by weight will prevent proper adhesion and can lead to osmotic blistering as trapped moisture attempts to escape through the coating.
Incorrect Product Selection
Not all epoxy products are created equal, and selecting inappropriate formulations for specific applications creates performance problems. 100% solids epoxies offer superior durability and thickness compared to water-based or solvent-based alternatives, making them the preferred choice for high-traffic areas like garages and commercial spaces.
Thin-film epoxy paints sold at big-box retail stores typically provide only 2 to 5 mils of dry film thickness compared to professional-grade systems that deliver 10 to 40 mils. This dramatic difference in coating thickness directly translates to durability and lifespan differences of years.
Environmental Control Failures
Installing epoxy during unsuitable weather conditions is a recipe for disappointment. Temperatures below 50°F prevent proper curing, while temperatures above 90°F accelerate the reaction too rapidly for proper application. Humidity above 85% can cause blushing, adhesion failure, and surface defects.
Professional installers monitor weather forecasts for a 3-day window, ensuring suitable conditions not just during application but throughout the critical initial cure period. Rain within 24 hours of application can ruin an otherwise perfect installation.
Improper Mixing and Application
Failing to thoroughly mix epoxy components, using contaminated containers, or applying coating too thick or too thin creates defects. Thickness variations of more than 20% across the floor surface result in uneven wear patterns and premature failure in thin areas.
Rushing the application and failing to maintain a wet edge creates lap marks and visual defects that remain permanently visible. Taking time to work methodically within the pot life yields dramatically better aesthetic results.
Key Takeaways
- Surface preparation accounts for 60% to 70% of installation time but determines 85% to 90% of long-term success, making it the most critical phase of the entire process.
- Texas climate conditions require seasonal installation adaptations, including early morning summer applications and substrate warming during winter to maintain optimal temperature ranges of 60°F to 85°F.
- Proper etching or grinding creates CSP 2 to 3 surface profile, with concrete requiring 24 to 48 hours of drying time before primer application can begin.
- Epoxy pot life of 35 to 45 minutes demands efficient mixing and application techniques, with most failures occurring when installers rush between stages or exceed working time windows.
- Complete curing requires 7 to 14 days, though light foot traffic may be permitted after 24 to 48 hours and vehicle traffic after 72 hours minimum.
- Professional-grade 100% solids epoxy systems deliver 10 to 40 mils thickness compared to 2 to 5 mils from retail epoxy paints, creating dramatically different lifespan expectations.
- Pricing for professional installation varies from $3,500 to $15,000+ for typical residential garages, depending on size, surface condition, decorative elements, and coating system quality, with custom quotes recommended for accurate budgeting.
People Also Ask
How long does epoxy flooring take to install in Texas?
Epoxy flooring installation in Texas typically requires 2 to 3 days: Day 1 for surface preparation including cleaning, crack repair, and etching with 24 to 48 hours drying time, and Day 2 for primer and epoxy application. Full cure and return to normal use requires an additional 3 to 7 days depending on traffic type and coating system.
Can I install epoxy flooring myself in Texas?
DIY epoxy installation is possible for homeowners with adequate preparation skills, though professional results require specialized equipment, climate control knowledge, and experience managing Texas heat and humidity. Surface preparation quality determines 85% to 90% of long-term success, making professional installation recommended for optimal durability and appearance, particularly for high-value spaces.
What temperature is best for applying epoxy in Texas?
Optimal epoxy application temperatures in Texas range from 60°F to 85°F with relative humidity below 85%. Summer installations should occur during early morning hours before temperatures exceed 85°F, as higher temperatures reduce pot life by 30% to 50% and can cause curing defects.
How much does professional epoxy installation cost in Texas?
Professional epoxy flooring installation costs in Texas vary widely from $3,500 to $15,000+ for typical residential garages depending on size, surface condition, preparation requirements, decorative elements, and coating system quality. Commercial installations range from $8,000 to $50,000+ based on square footage and performance requirements, with pricing dependent on project specifics and custom quotes recommended.
Do I need to acid etch concrete before epoxy in Texas?
Surface profiling through acid etching or mechanical grinding is essential for proper epoxy adhesion in Texas. Etching creates the CSP 2 to 3 surface profile necessary for chemical bonding, requiring 15 to 20 minutes contact time followed by thorough rinsing and 24 to 48 hours drying before epoxy application.
How long before I can drive on new epoxy flooring in Texas?
Vehicle traffic should be delayed for a minimum of 72 hours after epoxy application, with 7 days being optimal for full load-bearing capacity. Light foot traffic is generally permitted after 24 to 48 hours, but complete chemical cure requiring 7 to 14 days provides maximum durability and chemical resistance.
Frequently Asked Questions
What happens if it rains during epoxy installation in Texas?+
Rain within 24 hours of epoxy application can cause catastrophic failure including blushing, adhesion loss, and surface defects. Professional installers monitor 3-day weather forecasts and postpone applications when rain is predicted, as moisture contamination cannot be repaired and requires complete coating removal and reinstallation.
Can epoxy be applied over existing garage floor paint in Texas?+
Epoxy should not be applied over existing paint without complete removal, as the coating can only be as strong as its weakest layer. Old paint prevents epoxy from bonding directly to concrete, creating a failure point that will delaminate under stress. Professional preparation includes complete paint removal through grinding or chemical stripping.
How do I know if my concrete is dry enough for epoxy installation?+
Professional installers use calcium chloride moisture testing or electronic moisture meters to verify concrete moisture content below 4% by weight. A simple tape-down plastic sheet test, where you tape a 2×2 foot plastic sheet to the floor for 24 hours and check for condensation underneath, can indicate excessive moisture but doesn’t provide precise measurements.
What is the difference between 1-day and 2-day epoxy systems?+
One-day epoxy systems use fast-cure formulations that allow same-day primer and topcoat application but typically sacrifice some durability and chemical resistance. Two-day systems allow each layer to achieve proper cure before the next application, creating stronger chemical bonds and superior long-term performance, making them the preferred choice for professional installations in Texas.
Do epoxy floors need a topcoat or sealer in Texas?+
Professional epoxy systems include a clear topcoat or sealer that provides UV protection, enhanced chemical resistance, and easier maintenance. In Texas where UV exposure and temperature extremes are significant, polyurethane or polyaspartic topcoats offer superior protection compared to epoxy-only systems, extending floor life by 3 to 5 years.
Can epoxy flooring be installed in Texas summer heat?+
Summer installation is possible with proper planning including early morning scheduling, climate control, and fast-cure product selection. Temperatures above 85°F reduce pot life significantly and require experienced installers who can work efficiently within compressed timeframes. Many professionals prefer spring and fall installations when temperature and humidity conditions are optimal.
How long does professionally installed epoxy last in Texas?+
Professional-grade epoxy flooring installations in Texas residential applications typically last 15 to 20 years with proper maintenance, while commercial installations see 10 to 15 years depending on traffic intensity. Lifespan depends heavily on surface preparation quality, coating system selection, and ongoing maintenance, with properly installed systems consistently outperforming rushed or DIY installations by 5 to 10 years.
The epoxy flooring installation process steps in Texas require meticulous attention to detail, proper product selection, and adaptation to regional climate conditions. From initial surface preparation through final curing, each stage builds upon the previous to create a durable, attractive flooring solution that can serve residential and commercial spaces for decades.
Understanding the complexity of professional installation helps property owners make informed decisions about DIY attempts versus professional services. While some skilled homeowners successfully complete smaller residential projects, the specialized equipment, climate expertise, and installation experience that professional contractors bring often justifies the investment, particularly for high-value spaces.
If you’re considering epoxy flooring for your Texas property, whether in Travis County, Williamson County, or throughout the Austin metropolitan area, consulting with experienced professionals ensures you receive accurate project assessment, appropriate product recommendations, and installation quality that maximizes your flooring investment.
Ready to transform your concrete surfaces with professional epoxy installation? Visit our epoxy flooring blog for additional resources, or contact our team for a custom project evaluation. Professional installation adapted to Texas conditions delivers results that DIY approaches simply cannot match, providing the durability, appearance, and longevity you deserve.